This article isn’t a technical tutorial explaining how to use specific software or a website builder. Instead, I’m going to share a straight-forward process for building websites that works for me and my clients. I hope it will also help you find a process that works for you.
My process for building websites includes the following steps:
- Make A Plan
- Tell A Story
- Design to Convert
- Build What Works
- Launch and Grow
Wow. That sounds like a lot! And it is. But if you approach your website build one steps one at a time, it doesn’t need to be overwhelming.
So let’s begin.
1. Make A Plan
The planning process is important if you want a successful website. This step includes setting the goals for your website, understanding your audience and how you help them, planning your site framework, and gathering inspiration for your design.
What are the goals of your website?
What is the main purpose of your website. Are you building a website to get more leads, sell products online, share your portfolio, build brand awareness, or to blog? You may also have other goals in mind.
Ideally, I suggest you focus on one or two goals for your website at first. If you’re not sure what your goals are, you can check out my article, 6 Surprising Ways A Website Can Help Your Business, for some guidance.
Understand Your Audience / Clients
Next, you need to understand that you’re building your website for your audience or potential clients, and not for you! So, spend some time thinking about your audience or potential clients, and what value you bring to them.
To get started, I recommend you answer these questions:
- Who is your target audience?
- What problems do they have?
- How do you help them solve their problems?
- What’s the biggest benefit they get from your solutions?
Why is this important? Most people go to websites to find answers to problems, get help, or research someone or a business they’ve heard about. When you understand their problems and how you help them, you can provide the answers they’re looking for on your website.
What Is Your Website Framework?
Your website framework includes the tools you will use to build the website and the page structure and architecture for your website.
First, identify the functionality you need it to have. For example, if you want to sell products online, you’ll need your website to be able to collect payments.
Or, maybe you want to set up an email marketing funnel. Then, you’ll need to be able to integrate an email marketing tool and set up some automations.
I recommend making a list of all the functions and actions you need your website to do to accomplish your goals.
Your website framework also includes your sitemap. A sitemap is a diagram or list of all the pages and files you want on your website, and how they interconnect with each other. A sitemap can look something like this:

You can create a sitemap using a number of different tools. I like to use FlowMapp. Many people also recommend Octopus.do. Both of these products have free versions. Alternatively, you can create a chart or table using Google Docs or Google Sheets.
The tool you use isn’t that important. But, I recommend you think about the structure of your website before you start building it.
Identify Your Requirements
Think about what functionality your need your website to have. Are you going sell things or services on your website? Are you going to need membership areas? Do you want to be able to schedule appointment? Make a list of these requirements and keep them handy. You’ll want to make sure the tools you use to build your website can accommodate your requirements.
Choose Your Tool Stack
The tools you use for website are important! These tools include your website platform, themes and any page builders you’re going to use. Before you select your tools, look at your list of requirements for your website. Make sure the tool you use is flexible, and lets you add these things to your website.
Next, think about what you may need in the future. If you have future plans for your website, make sure your tools can also accomplish those goals. You don’t want to have to rebuild your website on another platform because you’ve outgrown your original choice.
Finally, think about the quality and reliability of the tools you choose. You want your website to be reliable and fast. Broken websites and slow loading pages don’t impress your future clients.
Gather Inspiration
I like to gather design inspiration at the beginning of each project. During this process, I’m looking for websites, or parts of websites, that help me visualize what I want for that project. Also, I’m looking for good color palettes and site structures.
Then, I compile my inspiration and use it as a starting point for creating a design style for the project. For example, I might copy one section of a website because I like the layout. Or, I might really enjoy the flow of another website. Also, I look for photos or graphics I think will work for the project.
You can compile your inspiration many ways. Some people like to create a Pinterest board. Others save the files to a folder on their computer or cloud storage system. I’ve kept inspiration in Evernote. I’m just starting to use Canva’s new whiteboard feature to create an inspiration board for each project.
2. Tell A Story
Content is arguably the most important piece of your website. I recommend you write it, or at least outline it, before you do any design work. The content is core of the website, and the design supports and brings it to life.
Why Content Matters
People usually come to your website to either solve a problem or reach a goal. A successful website provides the content and answers they are looking for.
I like to think of website content like a story. It’s telling the story how you understand your audience problems and goals, and how you can help the get the result they want. If you tell this story correctly, your website can start the know, like, and trust relationships that grow your business.
To learn more about using a story framework for your website content, see my article “How To Tell Your Buyer’s Story.”
I suggest breaking down the content planning and writing process into smaller steps. Then, you don’t get overwhelmed by the process.
Outline Your Content
First, outline your business offerings and how they benefit your target audience. You’ll want to think about how your services help your ideal clients or customers solve their problems and reach their goals.
To get started summarizing your services, you’ll want to outline the following items:
- A concise summary of each service you offer
- The benefits and results each service or product offers
- Your pricing if you want to share that on your website
- The steps someone takes to get started working with you
- How your services or products compare to your competitors
Second, you’ll want to start putting together your Unique Service Proposition (USP). This is the statement you use to describe how you help your target audience in one or two short sentences. Here is a good formula for drafting a USP:
I help/work with (WHO YOU SERVE) get to the (MAIN GOAL) and get (END RESULT).
You can switch around these elements to personalize your USP.
Then, you’ll want to put together some ideas for your about page. You may want to include:
- A mission or value statement
- Reasons why you are unique
- Your bio or history
- Educational credentials
- Why you do what you do
You can complete this step using simple bullet lists or creating an outline in your favorite note taking app. I’ve set up worksheets to help my clients with this process.
Draft Your Content
Now, you’re ready to start drafting the content. I like to draft out each page of the website in Google Docs. I start with a simple outline for each page, and then I fill in the rest of the content. But, I suggest you write using the method that works best for you.
Try to draft the content with a logical flow that helps the site visitor understand how you can help them. To get started, you can look at some websites that resonate with you. Notice the flow and structure of the content, and try to use a similar structure.
You can also refer to my article, A Simple Storytelling Framework to Write Better Content, to learn about the typical types of content on common website pages.
Content Formatting
For the last step, edit your draft by reducing any redundant content and rephrasing anything using industry jargon. In this instance, less is definitely more.
Then, you’ll want to format the content with shorter paragraphs and try to break things up using headings and bullet lists. Once you have the content formatted in this way, it will be easier to decide how to layout and design each page on the website.
3. Design To Convert
Designing your website is more than just putting pretty graphics on a page, using nice colors, or choosing the right typography. While those things are important, they’re not enough alone to make your website convert.
Below are the key elements for designing a website that converts.
Don’t Make Them Think
Your website needs to be easy to use. So, your navigation needs to be clear and concise. Also, avoid a lot of fancy features like sliders, popups, and animations. These types of features annoy a lot of people, don’t work well on mobile devices, and are bad for website accessibility.
You can take a look at my article “Does Your Website Need Fancy Features” to learn more.
Give Visitors Something To Do
You want to make sure your website has a clear call to action. Think about the main goal for your website, and then ask your site visitors to do that!
It’s okay to display the same button on a page multiple times. And, make sure that your buttons and calls to action are visibly distinct. For example, use a contrasting or complementary color for the main buttons.
Consistent Design Elements and Breathing Room
Websites are more desirable when things are consistent and uncluttered. So, start your design by creating a design guide or design system for your website. This design system will set the standards for consistent typography, consistent colors, and consistent spacing on your website.
Also, make sure you give your website plenty of white space. White space is the area on your website where nothing is going on! White space makes it easier to read things on the web, and it helps people focus on what you want them to. In fact, I suggest you start with too much white space, and then take it away.
You can check out my article “How To Build A Design System” to learn more.
Include Social Proof
People generally won’t buy from you until they know, like, and trust you. Social proof is what builds that trust. So, include testimonials, case studies, or logos from other businesses you’ve helped.
However, proceed with caution. You don’t want to overload any single page with too many testimonials. So, try to keep it to about three testimonials per page. You can create a special “Testimonials” page for people who want to read more.
Create Wireframes
Before you jump into designing your website, prepare a wireframe.
A low-fidelity wireframe is a simple layout of the web page structure, usually in black and white, similar to a blueprint. It’s just the content blocks for text and images, arranged the way you want them to flow on each page.
Once the low-fidelity wireframe is done, you can make a high-fidelity wireframe, or a mockup. This is when you start doing the design work and start adding the design elements to your website! These mockups don’t need to be a perfect representation of your website, but are a more polished version of the low-fidelity wireframe.
This phase is when your design starts to come to life as you add in your color palette, photos and graphics, buttons, and your content. You can even begin to lay out how each page will interact with other pages on your website.
To learn more about wireframes, you can check out this article on Hubspot: https://blog.hubspot.com/website/website-wireframe.
Using Premade Templates and Website Builders
Sometimes, it makes sense to start your design using a premade template from a website builder or theme. Using a template can eliminate the need for making mockups and wireframes and speed up the design process. However, I recommend taking time to carefully choose your template.
First, you want to make sure the template you choose works with your content. Take the time to think about how your content will work into the template, and if the flow of it makes sense.
Second, I also recommend taking some time to learn about how to edit the template if you can. Then, you can adjust and modify the template to work with the flow you want your website to take, and you can give the template a little more uniqueness and your own style.
4. Build What Works
Now, you’re finally ready to really get your hands dirty and build the website. Before you start building and developing the site, make sure you know how to use the website building tool you’ve chosen. At the minimum, I recommend you spend at least a few hours playing around with the website builder before you dive in.
Remember, building and developing a website isn’t always a linear process. You might discover that you’re working on a couple of phases simultaneously.
Often, I may start developing the website after the planning step, such as setting up styles. Regardless of when I start the development process, I like to build out my sites as follows:
Global Styles
I always start with my global styles. Once you’re comfortable with your tool of choice, set up your fonts and global styles. Dig out the style guide you created earlier, and use that as your roadmap for setting up your styles. I always make sure to configure the following design elements:
- Color palette
- Typography settings
- Global button settings
- Page width and content width
Configuring these styles before you start building out pages helps keep design consistency throughout your website.
Headers And Footers
Next, I tackle the headers and footers. I like having them ready when I build out the pages, so I can see how everything will look together. Or, maybe it’s because headers and footers can be the most challenging part of the design for me, and I like to get it over with!
Again, I often tweak and update headers and footers throughout the development process as the design and site come to life, so that everything works harmoniously together.
Building The Pages
Now, I finally get to the fun part! Personally, I like to start with the home page because it serves as a guide or entry point for the rest of the website. Plus, it is one of the most important pages of the website. Then, I usually build out the About page, another one of the most visited pages on your website.
Once these pages are done, I like to get client feedback to confirm we’re on the right track. If you’re building your website for yourself, then I’d also suggest reviewing these pages before you go forward. Make sure you like how the website is progressing. If you’re not entirely happy, making changes now will be a lot easier than after all of the pages are built.
Once you start building out the rest of pages for the website, make sure to refer back to your sitemap to track your progress and to make sure you’re building out and connecting the pages the way you want to.
If you want to go one step further with your website, include these things in your building process:
Page SEO
Make sure to set up your page SEO by using appropriate heading tags through the content and giving your images alt text descriptions. Also, write good permalinks, SEO page titles and meta descriptions. A good WordPress SEO plugin like SEOPress or the SEO Framework will help you a lot.
Responsiveness
Always make sure your pages look good on different screen sizes. Just about every website builder gives you the opportunity to view and edit your pages at three different screen sizes: Desktop, Tablet, and Mobile. Sometimes you may need to adjust your layout for the smaller screen sizes.
Format Images
Inappropriately formatted images can really slow down your website and make it look unprofessional. So, you want to make sure you format them correctly.
First, you want to make sure the image has the correct dimensions for the place it’s going to be in the website. If you’ve got a square place on your website for the image, upload a square image, not a rectangular one. Similarly, if you’ve got multiple images side-by-side, make sure all three images have the same dimensions and file size.
Also, you don’t want to use an image that’s too small or one that’s too large. Often, photos we receive from photographers, or the pictures we take on our phones, are just too large. So it’s best to resize them to more appropriate sizes. (For more information about image sizing, see my article, Five Tips for Designing Your Website Like a Pro.)
Second, you want to make sure the images are compressed to as small a file size as possible without compromising the quality of the image. You can compress your images before you upload them using a tool like Affinity Photo or Photo Shop, or you can use an online tool like tinypng.com, or bulkresizephotos.com.
Alternatively, you can install a plugin on your WordPress website that automatically compresses your images when you upload them. I like Short Pixel the best, but there are many other good plugins that do this.
Using Premade Templates and Website Builders
If you’re building your website with a tool like Squarespace, Wix, or even Brizy Cloud, some of the development will be done automatically for you. The template you choose will likely already have a header and footer built in, and will generally be responsive for multiple screen sizes.
However, I still suggest you review all your pages to make sure everything looks good. As I mentioned above, you may need to adjust your content or your images for the pages to look right. Also, make sure your website navigational structure is correct, and double check that your page titles and URLs aren’t the defaults from the template.
Testing Your Website
Testing your website is one of the most important steps to take before and after launching your website. You want to make sure everything works as it should when you share your website with the world. Next, I’m going to provide you with a brief summary of some of the tests you should run.
Mobile Responsiveness
Although you checked mobile responsiveness while building the site, you need to check it again now that the site is complete. Fortunately, there are several apps that make this pretty easy to do.
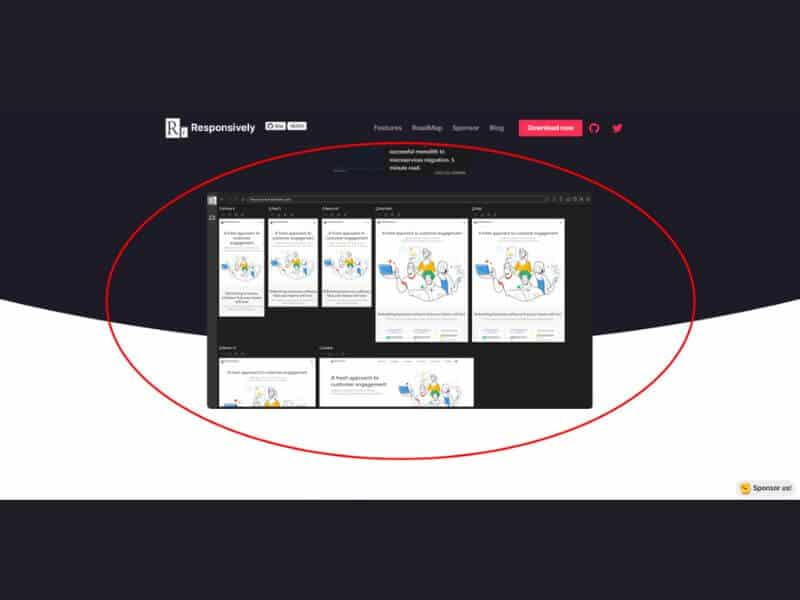
One of my favorite apps is responsively.app. You can download this for free or install the web browser app. Once the app is launched, you then type in your website URL in the address bar. The app will display your website in a mockup of various screen sizes. You can even navigate through the website and see how things change and look on the different screen sizes.
Another good tool is Responsinator. It works very similarly to Responsively.app, but it’s not quite as robust. Responsinator is an online app, so there is nothing to download.
Also, check your website on your phone, and get your friends to do the same. Real-life tests are always the best.
Check Navigation and All Links
Next, make sure to check all the links on your website and see if they work as expected. This test includes clicking on all navigation buttons, footer links and other links on all the pages. While this can be a time consuming process, you won’t regret spending the time to fix any broken or missing links.
This is a good time to also just navigate through the website to make sure all aspects of the site are working the way you want it to.
Website Speed
No one likes a slow website! So, you want to ensure that your website loads as quickly as possible. There are a bunch of free tools to help you determine the speed of your site and also point out areas of your website that need improvement. I recommend using these tools:
- GTmetrix
- Google Page Insights
- Webpagetest.org
- Pingdom
However, I do have one word of caution: Don’t lose any sleep if you’re not getting all green scores with these tests.
While site speed is important, it’s not the only thing that helps your website succeed. And, what happens in the real world is more important than a simulated test.
Also, please note you may not be able to run speed tests until you launch the site. If that is the case, don’t forget to test it then.
Website Accessibility
Website accessibility is making sure that your website can be used by all types of users, including people with disabilities, visual impairments or other characteristics that make it harder to navigate a website. Ideally, you want everyone to have equal access to your website.
Website accessibility can be quite complicated. But, there are tools that can help you address some of the most common problems with websites. I like the WordPress plugins Accessibility Checker from Equalize Digital and WP Accessibility from Joe Dolson.
I avoid overlay plugins like UserWay and accessiBe because often these overlays create more problems than they solve. (For more information on this you can check out this article: https://www.accessibility.works/blog/avoid-accessibility-overlay-tools-toolbar-plugins/).
Website accessibility actually needs to be addressed at all phases of building your website, from choosing your fonts and colors to building out your pages. But, I included it here because I like to check web accessibility again after I’ve finished building the site.
Form Testing
Always check your forms and signups to make sure they work before you launch or just after you launch. Send sample contact requests through your contact form. Test your email newsletter sign up or any other form you have on your website.
Test All Functionality
Go through all the actions you want your site visitors to take, such as online purchases, booking appointments, and downloads. Also, make sure your website’s search function works properly. If you’ve set up any type of automation to link your website to third-party apps, make sure you test that as well. Test membership signups, client portals, or any other extra tools or functionality you’ve added to your website.
5. Website Launch and Grow
First, pat yourself on your back because you’ve made it this far! Good job. Then, get ready for what I think is the scariest part of building a website: The Launch. It’s time to share your website with the public, and you want to make a good impression. It’s kind of like getting up on stage and performing.
Configure DNS / Domain Name
Once your website is ready to share with the world, you need to point your domain name (your website address) to your hosting account’s servers. Your website host should have instructions telling you how to do this.
If you’ve never done it before, I recommend contacting your website hosting support desk to ask for help. Sometimes, web hosts are willing to walk you through this process. Or, they may have instructions specific to your domain registry company.
Another option is to ask your domain registrar for help, once you have the necessary information from your web host.
After you configure your DNS / Domain Name settings, you’ll likely have to wait a bit for the information to propagate and for your website to show up on the Internet using your domain name. This process is sometimes pretty instantaneous, or it can sometimes take up to 24 hours. So you just need to be patient.
Enable SSL Certificate
Once your website is showing up with your domain name, you need to make sure you have an SSL Certificate enabled. Your SSL Certificate is what verifies the security of your website. (To learn more about SSL Certificates you can read this article: https://blog.hubspot.com/marketing/what-is-ssl.)
Most website hosting companies will provide you with a free SSL Certificate for basic websites. In fact, you shouldn’t have to pay for one. If your web hosting company wants to charge you for this, I recommend finding another web host. (My recommended WordPress web hosts are: Wordify, Flywheel Hosting and Site District Hosting).
Without an SSL Certificate, your website will not have the little padlock next to your website address in the search bar, and site visitors may get warnings that your website is not secure.
Additional Testing
Now, it’s time to do another round of testing! You want to make sure that everything is still working as it should now that your website is live. Make sure to test your forms again, look at the website on different types of devices, and check your website loading speed.
Submit Sitemap to Google Search Console
We all want our website and its pages to show up in Google search results! But Google (and Bing) need to know about your website so their bots can crawl it and index it.
The best way to ensure this happens is to submit your sitemap to Google Search Console. If you’re using a good SEO plugin for your WordPress website, you’ll already have a sitemap in the proper format to submit.
To begin the process, you’ll first need to verify you own your website with Google Search Console, and then you can submit your site map. You can check out this great article from SEMrush to learn how to do this.
Website Analytics
Finally, I recommend you set up some type of analytics tracking tool on your website. You’re going to want to know how many people visit your website, what pages they visit the most, and what types of searches brought people to your website.
Most people will automatically think they need to install Google Analytics. While Google Analytics is a great tool, there might also be better options out there for you. You can check out my article, Is It Time To Say Goodbye To Google Analytics?, to see what analytics tool might be best for you.
Announce Your New Website
Congratulations! Now, you’re almost done. Your website is live, it looks good, and all you have left to do is let the world know about your new website! Here are some suggestions for announcing your new website:
- Make sure your website address is in your email signature.
- Announce your new website on all your social media channels.
- Announce your new website to your email marketing list.
- Let your current clients know you’ve got a new website.
- Use a tool like Go Viral to drive traffic to your website.
Conclusion
Well, that’s a description of my entire design process in a not-s0-small nutshell. You do not necessarily need to follow this entire process yourself, but you can use it as a roadmap for building your next website. And, now you hopefully understand all the various steps involved in building a successful website.
I hope you thought this article was useful. Of course, if you ever want help building your next website, please reach out.